https://www.ericcointernational.com/application/mems-imu-error-analysis-and-compensation.html
Ericcogyro is a leader supplier of Inertial Sensor products North Finder,North seeking system,DTG,FOG,MEMS Gyroscope,Accelerometer,IMU,INS,electronic compass, our inertial sensor are sold worldwide and get the good feedback from our clients .
Monday, February 19, 2024
Sunday, February 18, 2024
Electronic Compass Hard Magnetic Error Compensation
1. Electronic compass error classification
Electronic compass plays an important role in the navigation application of modern society, because electronic compass is based on the particularity of geomagnetic navigation, digital compass is prone to geomagnetic interference and magnetic material interference in actual use, resulting in measurement errors, according to the source of magnetic interference, can be divided into hard magnetic interference error and soft magnetic interference error. Among them, the hard magnetic interference will cause the zero deviation of the compass measurement value, which will lead to the inaccurate positioning of GPS in the navigation system. It will cause immeasurable impact on activities such as maritime navigation positioning and disaster rescue positioning. Moreover, compensation of hard magnetic interference error is a prerequisite for compensation of soft magnetic interference error. Therefore, before compensation of soft magnetic interference for electronic compass, it is necessary to ensure that the hard magnetic interference error has been compensated, so as to achieve a complete digital compass error compensation process.
2. Hard magnetic error analysis
In the actual working environment of electronic compass sensors, there are inevitably ferromagnetic materials, and one of these ferromagnetic materials is called hard magnetic materials. Because the hard magnetic material has the characteristics of high coercivity, it will be magnetized only in the external magnetic field with sufficient magnetic field strength. Although it is not easy to magnetize hard magnetic materials, the remanent magnetism after it is magnetized will be retained for a long time and is not easy to remove. The magnitude and direction of the magnetic field vector of hard iron in the carrier fixed coordinate system are fixed, and do not change with the course and position of the carrier.
Therefore, the error caused by hard magnetic interference is constant in the short term, which can be considered as a constant additional error output during calibration. At the same time, hard magnetic interference can be used to characterize all time-invariant perturbations of digital compass sensors without losing generality. In the actual measurement and use, the hard magnetic interference will cause the measurement value of the electronic compass to appear obvious deviation, that is, zero drift. In the ideal case of no hard magnetic interference, the electronic compass in the static state, rotating measurement one week, can draw a circle with the center at zero. The hard magnetic error causes the center of the circle to shift, which is called zero drift. Because of the particularity of the hard magnetic error, it can not be avoided and processed by simple physical means, but can only compensate the data collected by the compass to remove the hard magnetic interference error.
3. Hard magnetic interference error compensation method
3.1 Least square method
Generally, the constant error of the sensor is relatively stable, and the corresponding parameters can be obtained by calibration method, and the parameters are introduced into the error calibration equation. To eliminate the constant error of the sensor. Therefore, the error compensation method based on least square method can be adopted. As a kind of mathematical optimization technique, least square method can obtain the best matching function of the optimized object by minimizing the square of the error. Using least squares method can make it easier to obtain unknown data and minimize the sum of squares of error between the obtained data and the actual data. Least squares can also be used for curve fitting. The least square method is the most widely used method in system identification, which can be applied not only to dynamic systems, but also to static systems. It can be used to estimate linear and nonlinear systems as well as offline systems, and the online estimation of systems often uses least square method. In the random environment, when the least square method is used, the observation data does not need to provide its probability and statistics information, but the estimated results have quite good statistical characteristics. The least square method is easy to understand and master, and the recognition algorithm developed based on the least square principle is relatively simple to implement. When other parameter identification methods encounter difficulties, least square method can provide corresponding solutions. The most likely value of unknown model parameters is at the minimum of the sum of repeated error squares between the actual observed value and the calculated value, and the obtained model output can be closest to the output of the actual system, which is the principle of least square.
3.2 Algorithm simulation experiment
The Matlab editor produces a set of standard circle tracks whose center is not at the zero point of the coordinates. The center of the first standard circle is located at the coordinates (2,5) with a radius of 5, as shown in Figure 2. The center of the second standard circle is located at coordinates (114, -304), and the radius is also 5, as shown in Figure 3. It is assumed that the two standard circular trajectories are the actual trajectories measured by the digital compass under hard magnetic interference. Simulation experiments are carried out with the data to verify the feasibility of the algorithm.
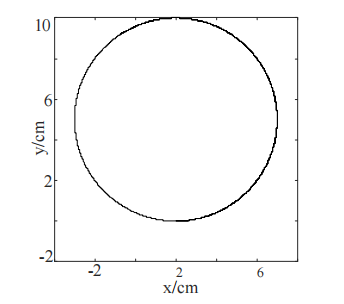
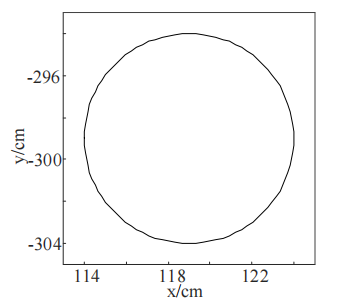
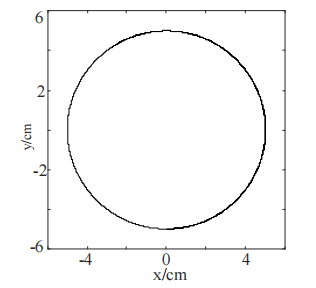
The experimental results are shown in FIG. 4 and 5 respectively. After zero deviation compensation, the zero drift of the standard circle is effectively compensated, and the center coordinates of the circle are located at (0,0) after compensation, and the trajectory does not deform. Moreover, good improvement is achieved in both large and small drifts. The simulation results show that the algorithm based on least square method is feasible.
4 Summary
We analyze the source of the hard magnetic error of the electronic compass, select the least square method as the error compensation method according to the error properties, and carry out the program design and simulation experiment based on the least square algorithm to verify the feasibility of the algorithm program. The feasibility and correctness of the algorithm in theory are verified, which lays a foundation for the actual measurement experiment. Ericco's E-compass products such as ER-EC-360A, ER-EC-365A and ER-EC-385CAN have hard magnetic, soft magnetic and inclination compensation functions, so we can use the least square method to compensate its hard magnetic interference error, so that the zero drift can be effectively compensated.
Research on MEMS IMU error modeling and temperature compensation technology
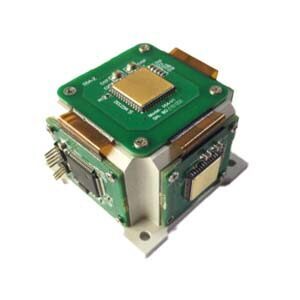
IMU is a sensor combination used to measure the motion state of an object, mainly composed of a gyroscope and an accelerometer. IMU is usually used in navigation, attitude control, motion tracking and other fields. By measuring the angular velocity and acceleration of an object in three axes, it can calculate the object's attitude, position, speed and other information. The error of MEMS-IMU often requires calibration, which is also important. Then its error can be divided into systematic error and random error. Systematic errors can be eliminated through sensor calibration, while random errors can be understood as the degree of fluctuation and drift of the zero bias. It is usually assumed that the zero bias noise of low-cost MEMS-IMUs obeys a Gaussian distribution. The modeling and compensation of systematic errors and random errors is now an important research direction.
System errors can be eliminated through hardware calibration and software compensation. Hardware calibration usually uses professional calibration equipment to calibrate the IMU, measure the output of each sensor and establish a calibration curve, so that the output can be corrected based on the calibration curve in subsequent use. Software compensation uses algorithms to correct the sensor output, such as using a Kalman filter to perform state estimation and error compensation on the IMU output.
For random errors, temperature compensation technology can be used to reduce them. Since the performance of MEMS sensors is affected by temperature, studying the effect of temperature on sensor output and compensating it is an important technology. Currently, common temperature compensation technologies include neural network compensation, support vector machine compensation, and polynomial fitting compensation. These technologies collect sensor output data at different temperatures, establish a mathematical model of temperature and sensor output, and compensate the sensor output in real time to reduce the impact of temperature on sensor performance.
In addition, in order to further improve the performance of MEMS-IMU, the error transfer function method can also be used to model and compensate the IMU error. This method analyzes the error transfer function of the IMU, establishes a mathematical model of the error transfer function, and compensates the IMU output according to the model. This method can more comprehensively consider the impact of various factors on IMU performance, thereby more accurately estimating the IMU's output and making compensation. This article will talk about MEMS IMU error modeling and MEMS IMU temperature compensation technology.
1.MEMS IMU error modeling
The error modeling of MEMS IMU (Inertial Measurement Unit) mainly focuses on the quantitative description of various error sources in the IMU. These error sources mainly include scale factor error, cross-coupling error, zero bias instability, etc.
The scale factor error and cross-coupling error can be expressed in matrix form and are related to the noise spectrum of the gyroscope and accelerometer. These errors average to zero over time, but any asymmetry or nonlinearity in the scale factor and cross-coupling error will form part of the vibration error and will not cancel each other out over time.
In addition, random errors are also an important source of MEMS IMU errors, mainly including quantization noise, angle (velocity) random walk, bias instability, angular rate (acceleration) random walk and rate ramp, etc. Among them, angle (velocity) random walk and zero-bias instability are the main manifestations of MEMS IMU.
In order to reduce these errors, various compensation methods can be used. For example, system errors are eliminated through hardware calibration and software compensation, and the impact of random errors is reduced through temperature compensation technology. Temperature compensation technology can collect sensor output data at different temperatures, establish a mathematical model of temperature and sensor output, and compensate the sensor output in real time based on the model.
In addition, the error transfer function method can also be used for error modeling of MEMS IMU. By analyzing the error transfer function of the IMU, a mathematical model of the error transfer function is established, and the output of the IMU is compensated based on the model. This method can more comprehensively consider the impact of various factors on IMU performance, thereby more accurately estimating the IMU's output and making compensation.
In general, error modeling of MEMS IMU is a complex process that requires comprehensive consideration of multiple factors and methods. Through in-depth understanding and research of sensor performance, continuous optimization of compensation algorithms and improvement of manufacturing processes, the performance and reliability of MEMS IMU can be improved, providing important technical support for the development and application of navigation, positioning, attitude control and other fields.
2.MEMS IMU temperature compensation technology
The temperature compensation technology of MEMS IMU mainly studies the impact of temperature on sensor performance and takes corresponding methods to reduce this impact. The following are several common temperature compensation methods:
2.1 Hardware Calibration and Compensation: By calibrating the IMU during the manufacturing process, the output of each sensor is measured and a calibration curve is established. In actual use, the output of the IMU is corrected according to the calibration curve to reduce the impact of temperature on sensor performance.
2.2 Establish a mathematical model: By collecting the output data of the sensor at different temperatures, establish a mathematical model of temperature and sensor output. This model is used to compensate the sensor output in real time to reduce the impact of temperature on sensor performance. Common mathematical models include polynomial fitting, linear regression, and neural networks.
2.3 Error transfer function: By analyzing the error transfer function of the IMU, a mathematical model of the error transfer function is established. Compensating the output of the IMU based on this model can more comprehensively consider the impact of various factors on the performance of the IMU, thereby more accurately estimating the output of the IMU and performing compensation.
2.4 Dynamic adjustment: In some cases, the impact of temperature on sensor performance can be reduced by dynamically adjusting the operating parameters of the IMU. For example, by adjusting parameters such as sampling frequency and gain, the performance of the IMU at different temperatures can be made more stable.
In summary, temperature compensation technology for MEMS IMUs requires selecting an appropriate method based on the specific situation. Through in-depth understanding and research of sensor performance, continuous optimization of compensation algorithms and improvement of manufacturing processes, the performance and reliability of MEMS IMU can be improved, providing important technical support for the development and application of navigation, positioning, attitude control and other fields.
Summarize
In general, research on IMU error modeling and temperature compensation technology based on MEMS is an important research direction. By in-depth study of the error sources and characteristics of MEMS-IMU, and using appropriate calibration and compensation methods to reduce the impact of errors, the performance and reliability of MEMS-IMU can be improved, providing information for the development and application of navigation, positioning, attitude control and other fields. Important technical support. As a company that independently researches inertial systems, ERICCO has conducted in-depth research on MEMS IMUs. For example, the navigation-grade ER-MIMU-01 and ER-MIMU-02 can independently seek north, and the built-in gyroscopes and accelerometers are also highly accurate. If you are interested in our IMU, please click on the article link below to learn more.
Tuesday, February 6, 2024
Analysis of Influencing Factors of Measurement Error of Tilt Sensor
1. Measurement accuracy of tilt sensor
The measuring accuracy is the measuring error range of the instrument. Measurement error and error is the basic problem of measurement test, any measurement will inevitably have measurement error, all the measured values are approximate values. Due to the influence of instruments, experimental conditions, environment and other factors, the measurement results can not be absolutely accurate, there will always be a large or small error between the measured value and the objective actual real value, and the range of this error is the accuracy of the measurement.
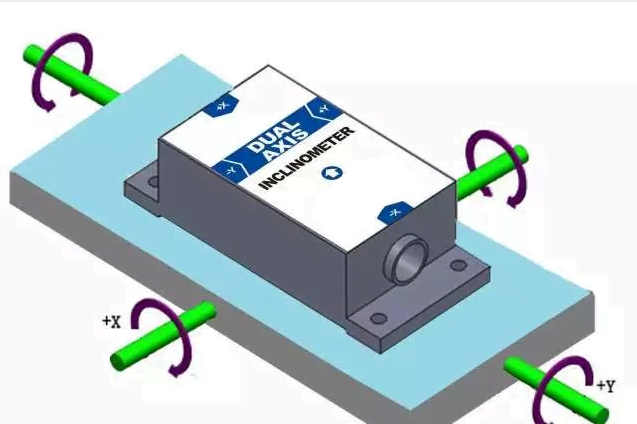
The tilt sensor has been used as an Angle measuring device to measure the relative sea level of objects for more than 100 years. From the traditional bubble type level, to the current acceleration principle or electrolyte principle and liquid capacitance principle, has been developed very mature, product accuracy continues to improve, the application field is gradually extensive and professional, manufacturers are also very many. However, the description of accuracy of most tilt sensors on the market is vague or there is a certain deviation. Generally speaking, according to the metrology law and relevant national/international standards, the description of accuracy has a general and deterministic description, but these descriptions are universal, whether they are suitable for the field of tilt sensors, there is no clear conclusion. First of all, we need to analyze the factors that affect the measurement accuracy of the tilt sensor, and then discuss how to determine the definition of the accuracy of the tilt sensor. Take the Angle sensor of acceleration principle as an example. It is the measurement of gravitational acceleration on the sensitive axis of the acceleration sensor into Angle data, that is, the Angle value and the acceleration value into a sine relationship. This principle is fully explained in many literature and product descriptions.
2. Indicators that affect the measurement accuracy of the inclinometer sensor
2.1 Sensitivity error - Sensitivity is used to describe the relationship between the input and output of the instrument, the input and output of the sensor are respectively used as the horizontal and vertical axis of the rectangular coordinate system, and the corresponding points of the ideal input and output values are connected into a curve, the slope of the curve is the sensitivity. The error value depends on the characteristics of the core sensor, but it is also related to the response frequency.
2.2. Zero bias - that is, when the input value is zero, the output value is not zero. The error depends on the characteristics of the core sensitive device itself, which means that in the case of the sensor without Angle input (absolute horizontal plane), the output Angle value measured by the sensor is not zero, and the output Angle value is zero offset.
2.3. Nonlinear error - the actual input and output value relationship curve does not coincide with the theoretical input and output value relationship curve, and cannot be made to coincide by translation, such errors are called nonlinear errors. The general expression method of its magnitude value is maximum error/range, that is, when the input reaches the maximum range, the output error is divided by the maximum range.
2.4. Horizontal axis error - refers to the error caused by coupling to the output signal of the sensor when the sensor applies a certain acceleration perpendicular to its sensitive axis or tilts at a certain Angle. For example, for a single-axis tilt sensor with a measuring range of ±30° (assuming that the X direction is the inclination direction of the inclination measurement), when a tilt of 10° occurs in the space perpendicular to the X direction (at this time, the tilt Angle of the actual measured X direction remains unchanged, such as +8.505°), The output signal of the sensor will cause an additional error due to this 10° tilt, which is called the cross-axis error. This extra error varies depending on the product. When the horizontal axis error of the inclinometer sensor is 3%FS, the additional error generated is 3%×30°=0.9°, and the actual output Angle of the sensor is simply estimated to be 9.405°(=8.505°+0.9°). At this time, even if the nonlinear error of the inclinometer sensor reaches 0.001°, relative to the horizontal axis error, this nonlinear error can be ignored, that is, as the measurement accuracy of the inclinometer sensor, the horizontal axis error cannot be counted, otherwise it will cause a large measurement error.
2.5. Allow the input shaft non-coincidence degree - refers to the sensor in the actual installation process, allow the sensor horizontal (Z direction) installation deviation, the index actually includes the input shaft non-alignment, vertical axis non-alignment error of two aspects. Generally speaking, the inclination direction of the inclinometer sensor is required to be parallel or coincide with the specified edge of the sensor when it is installed, which indicates that a certain installation Angle deviation can be allowed without affecting the measurement accuracy of the sensor. When the sensitive axis of the inclinometer sensor does not coincide with the actual tilt direction, the extra error is sinusoidal with the increase of the tilt Angle. The actual test shows that when the Angle between the sensitive axis of the inclinometer sensor and the actual inclination direction is more than 3°, for the linear error of the inclinometer sensor with the range of ±30° ±0.01°, the additional error will reach ±0.3~0.5°, which is much larger than the nonlinear error.
2.6. Repeated measurement accuracy - that is, when a value is repeatedly measured, the output value is not fixed to the same value, there will be random fluctuations, or in line with a random distribution. The error value depends on the characteristics of the core sensitive device and cannot be improved by subsequent correction measures.
2.7. Effect of temperature on zero point and sensitivity - also includes drift and repeatability of the temperature curve, which depends on the own characteristics of the core sensitive device and cannot be improved by subsequent correction measures. In the case of repeatability, it can be corrected later, depending on the number of correction points (Angle points and temperature points). The more correction points, the better the temperature drift accuracy.
3 Summary
It can be seen that the system errors of ER-TS-3160VO, ER-TS-4250VO and ER-TS-4258CU include sensitivity error, zero bias, repeatability and temperature drift repeatability, which cannot be corrected and compensated. Random error includes horizontal axis error, input axis misalignment, nonlinearity, temperature drift linearity, which can be improved by correction and compensation measures. Their resolution has nothing to do with accuracy, so they cannot be included in the accuracy index.
Therefore, the measurement accuracy of the inclinometer sensor must not be measured only by nonlinearity, and it is necessary to synthesize the systematic error and random error of the sensor.
Sunday, February 4, 2024
Thursday, February 1, 2024
Stability Test and Analysis of Tilt Sensor
As a kind of angle measuring instrument, tilt sensor is widely used to measure the vertical angle of missile launching guide rail and the attitude measurement of engineering equipment.
In practical applications, the measurement focus of inclinometer sensor is stability measurement, so improving the stability of inclinometer sensor measurement becomes the most important thing. Because the external temperature has a great influence on the stability of the sensor, we focus on the test and comparative analysis of the working stability of the two tilt sensors in the field environment.
During the test, two inclinometer sensors using the same accelerometer were selected in the same field environment, and their starting characteristics, static stability and dynamic following were tested. Experimental data of the two sensors were collected and compared.
1. Sensor stability test
In the stability test of tilt sensor, according to the use of the tilt sensor on the installed equipment, this paper focuses on the test of the start-up characteristics, dynamic following and static stability of the tilt sensor. The measurement accuracy of the two inclinometer sensors selected for testing in this paper is 0.016°, and the inclination Angle of the test equipment is 60°. Before starting, the inclination sensor is in the horizontal state. The two tilt sensors selected during the test are named Sensor A and Sensor B.
1.1 Test Purpose
After a series of tests, the start-up, dynamic following and steady-state characteristics of the inclinometer sensor are obtained, which are easy to form charts for analysis.
1.2 Test Equipment
The two inclinometer sensors selected in this paper are finished products, which are applied to the mechanical equipment to be tested as test equipment.
1.3 Test Environment
Because the test data obtained by the two sensors needs to be compared, the test environment of the two sensors is placed in the same place at the same time, that is, the test equipment is placed at the site where the device is used.
1.4 Test Platform
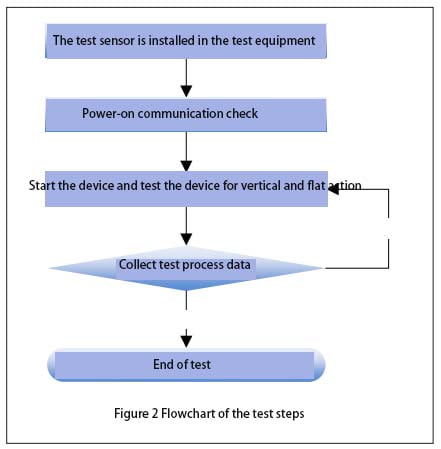
The tests were mainly conducted on two vertical devices. In the test process, firstly, the selected two inclinometer sensors are installed in the installation position of the test equipment and installed according to the sensor instructions; After that, power and communication checks are carried out on the inclination sensors to ensure that the two sensors can work normally. Finally, the test is carried out according to the test steps, and the output data in the whole process of sensor test is recorded.
1.5 Test Content
This paper mainly tests the starting characteristics, dynamic following and steady state characteristics of the two tilt sensors, that is, the normal use process of the test equipment. Since the entire process of using the sensor on the test device is tested, the test will be divided into three phases and conducted several times.
1.6 Test Procedure
The whole test process is relatively simple, and the test step flow is shown in Figure 2.
1.7 Test data analysis
Since the inclinometer sensor is tested in a field environment, it is necessary to consider the temperature change of the environment. In this paper, the field environment temperature change curve is simulated as a sine curve, as shown in formula (1) :
f(t)=ksin((t×2π)/T) (1)
Where, t — time, the value is the test time point;
k — the difference between the highest and lowest temperature of the day, which in this paper takes the value of 24 ° C;
T — Time period, the value is 24 h. The test was conducted during the day, and the rate of temperature change was faster, so
We take the derivative of f(t). By substituting the values obtained in the test into the derivation formula, the fastest temperature change rate can be obtained, that is, 0.1 ℃/min.
1.71 Testing Startup features
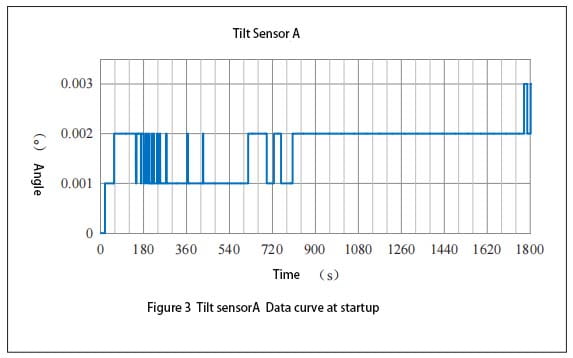
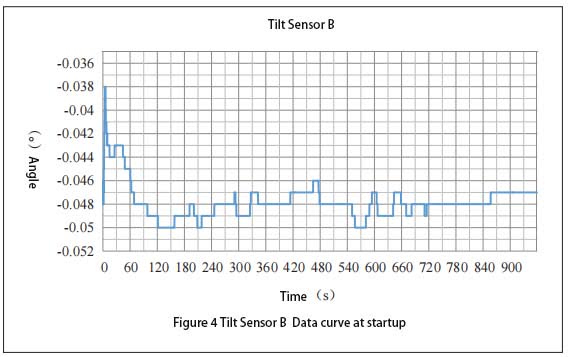
The equipment equipped with the inclination sensor is placed on the test site, and the measuring part of the sensor is placed in the horizontal state. At this time, the sensor is operated with power off. Power on the sensor two hours later and record the data generated within one hour after the sensor is powered on. Figure 3 shows the data curve of A and Figure 4 shows the data curve of B. It can be seen from Figure 3 that the Angle measurement value of A is 0.002° within 1 minute of power-on; The measurement value fluctuates from 0.001° to 0.002° and changes rapidly after 1 to 5 minutes of power-on. The measurement error is 0.001°. From 5 minutes to 14 minutes of power-on, the measured value fluctuates between 0.001° and 0.002°, while the fluctuation frequency is low, and the measurement error value is 0.001°. The measured value is stable after 14 minutes of power-on. It can be seen from the above that the Angle sensor selected in the test gradually stabilizes after 1 minute of power-on start-up. As can be seen in FIG. 4, the Angle measurement value of B is -0.048° after 15 minutes of power-on and start-up, the output measurement value reaches a steady state, and the measurement error value is 0.001°. The measurement value between 4 minutes and 15 minutes is -0.048°, and the measurement error is 0.002°. The measurement value between 1 minute 30 seconds and 4 minutes is -0.049°, and the measurement error value is 0.001°. The measured value is -0.048° within 1 minute and 30 seconds after power-on. The measurement error is 0.002° between 1 minute 30 seconds and 15 minutes after power-on and start-up, and then reaches stability.
The comparison between FIG. 3 and FIG. 4 shows that A reaches the stable state faster than B during power-on start-up; For A period of time after reaching stability, the measurement error of A is smaller than that of B.
1.72 Dynamic characteristic test
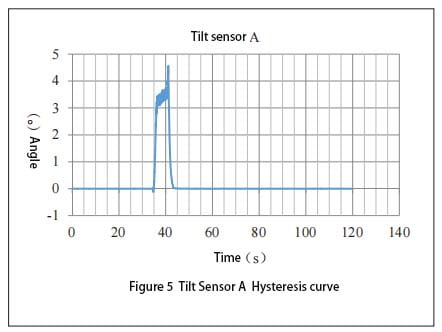
The Angle sensor is powered on and started. After the output measurement value is stable, the installation position of the vertical Angle sensor is raised. When the output data of the tilt sensor is obtained, the output measurement data of the sensor will be obtained to generate a curve. In addition, the parameters of device erection are obtained from the sensor mounting device, and the motion curve of the device erection is generated. The lag Angle data of the measured value of the sensor can be obtained by making A difference between the two curves. The lag curve of A is shown in Figure 5, and the lag curve of B is shown in Figure 6. As can be seen in Figure 5, the device is in a horizontal state before 35 s, and performs vertical action between 35 and 43 s. After 43 s, the sensor enters a stable state again. At 35 s, the device changes from a static state to a dynamic state, the hysteresis curve bulges downward, and the measured value of the sensor follows the device with good dynamic following. After that, the hysteresis of the sensor gradually increases, and the hysteresis reaches a maximum of 4.5° between 41 and 42 s. Finally, the Angle lag value becomes smaller and gradually becomes zero.
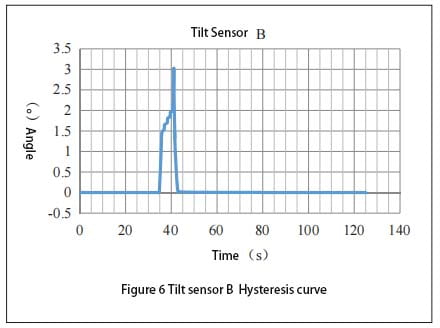
As can be seen from FIG. 6, the erecting process of B is the same as that of sensor A. When the device is erecting at 35s, the measured value of the sensor does not follow the sensor. After the device is erecting at A certain Angle, the measured value of the sensor will change the output, and the lag reaches a maximum of 3° between 41 and 42s. Finally, the angular lag value becomes smaller and gradually becomes zero.
The comparison between FIG. 5 and FIG. 6 shows that sensor A has better dynamic tracking performance than sensor B. When the lag between sensor and device reaches a certain degree, sensor B will use a new data processing method to improve sensor B’s tracking performance.
1.73 Steady-state characteristic test
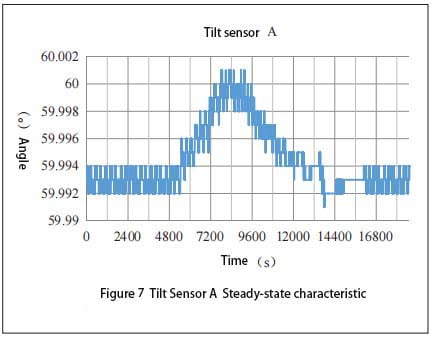
After the device is raised from the horizontal state to 60°, wait for the measurement data output by the inclinometer sensor to stabilize, continue to monitor and collect the sensor output data, and finish the test 5 to 6 hours later. The data generated during the steady state of the sensor is processed. The steady state curve of A is shown in Figure 7, and the steady state curve of B is shown in Figure 8. It can be seen from FIG. 7 that the output measured value of sensor A is relatively stable in the first 1 hour and 30 minutes. After 1 hour and 30 minutes, the measurement value began to shift to a large place, and reached a maximum value at 2 hours and 20 minutes, and then the deviation became smaller. At 4 hours it returns to its initial stable state again. Sensor A has a maximum offset of 0.007° when the temperature changes violently.
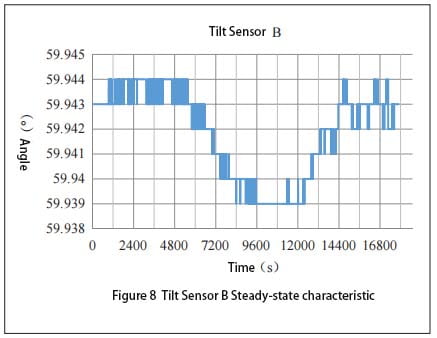
It can be seen from FIG. 8 that the output measured value of sensor B is relatively stable in the first 1 hour and 40 minutes. After 1 hour and 40 minutes, the measured value began to shift to a smaller place, and reached a maximum value at 2 hours and 30 minutes, and then the offset value became smaller. At 4 hours it returns to its initial stable state again. When the temperature change of sensor B is relatively drastic, the maximum offset of the measured value is
0.005°. Comparing FIG. 7 and FIG. 8, it can be concluded that under the same temperature change rate, the deviation of inclinometer sensor A is larger than that of inclination sensor B, and the measurement error of inclinometer sensor A is 0.001° larger than that of inclination sensor B. It can be seen that the steady-state characteristic of inclination sensor B is better than that of inclination sensor A.
2 Summary
The starting characteristic, dynamic characteristic and steady-state characteristic of the inclinometer sensor are tested. Through comparative analysis of the test data, the starting characteristic and following characteristic of the inclination sensor A are better. The dynamic lag of inclination sensor B is small, and the Angle deviation is small in steady state and drastic temperature changes.
When we choose the inclination sensor suitable for the device’s use environment, such as ER-TS-12200-Modbus and ER-TS-32600-Modbus, we do not know which one to choose, we can conduct stability test and analysis on it according to the above method. According to the test data results to choose a more suitable one.
Why Is Gyro Steering Replacing Traditional Magnetic Steering in High-Stakes Projects?
Precise directional measurement is the core technology for ensuring the wellbore follows the planned trajectory, effectively avoiding adja...

-
For more information, please indicate in the “Ask for a Quote” box at the bottom of the page that you learned about this North Finder fr...
-
Nowadays, (Micro-electromechanical Systems, MEMS) inertial sensors and inertial systems have become an indispensable development direction o...
-
Horizontal directional drilling technology completes the task of laying underground pipelines without destroying the surface environment....


.jpg)
